Angular2は、コンポーネント志向なJavascriptフレームワークです。
画面一つ一つの要素を部品化しコンポーネントとして切り出すことで、保守のしやすいソースを記述することができます。
今回は、Angular2の基本的な機能であるComponentの使い方を説明いたします。
Angular2 新規プロジェクトの作成
前回、Angular2 開発環境構築編 を書いてから随分な時間が経過してしまいました。
2016/08/04 時点でAngular2 のバージョンは、 2.0.0-rc.4 です。
前回記事を書いた時点では Angular2.0.0-beta.0 を使っていましたが、
beta.0 からバージョンが上がるごとにびっくりするようなBreaking Changeが幾度と無く発生し、
前に書いたコードはDeprecateなコードとなってしまいました。
Angular2.0.0-RCに入り、Breaking Changeが少なくなってきています。
また、Angular2.0.0 正式版のリリースも近づいており、そろそろプロダクションで使えるかな、という段階まで来ています。
趣味で開発しているアプリもAngular1からAngular2にバージョンアップしてみましたが、beta.0 の時よりも安定して利用できるようになってると感じています。
アップグレードは https://angular.io/docs/ts/latest/guide/upgrade.htmlに移行手順がでていますが、
とても変換できるような状態ではなかったので、1から全て書き直しました。
小さなアプリなら、全部書き直したほうが早いと思います。
さて、前回記事を書いた時には https://github.com/AngularClass/angular2-webpack-starter をベースに新規アプリを作りましたが、
今はAngular公式のコマンドラインツール、angular-cli がでているため、
今回はこちらを使って新規のアプリを作成していきます。
npm はインストールしている前提ですが、以下コマンドで新規アプリが簡単に作成できます。
npm install -g angular-cli  # angular-cliインストール

ng new プロジェクト名 # 新規アプリ作成
cd プロジェクト名 # 作成したアプリのディレクトリに移動
ng serve # angular2コンパイル & 開発サーバ起動

# http://localhost:4200 にアクセス
Componentとは
リッチで複雑な管理画面をJSフレームワーク無しで記述しようとすると、あっという間にスパゲティなコードができあがります。
UIの部品をComponentとして分割していくことで、複雑なアプリもより見通しのよく、保守しやすいコードにすることができます。
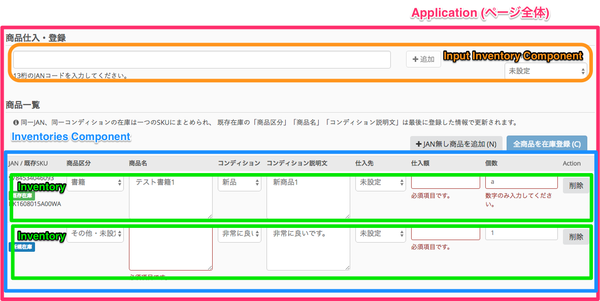
例えば、以下の様な管理画面を持つシステムを作っているとしましょう。

上記画面では、以下のようなことができるとしましょう。
- 画面上部のInput欄にコードを入れ追加ボタンを押すと、画面下部商品一覧に商品が追加される
- Input欄に入力されたコードが正しいものかどうかも検証する
- 正しいコードが入力されたら、追加するボタンが押せるようになる
- 追加ボタン押下でサーバから商品情報を引いた後、商品一覧テーブルにアイテムを追加する
- 商品一覧テーブルで個別の商品情報が入力可能
- 各入力フォームにはそれぞれバリデーションが設定されている(例: 数字しか入力できない、必須項目等)
- 商品一覧テーブルに入力された情報が全て正しい場合のみ、在庫登録ボタンが押下できる
こういった機能をもつ画面をJSフレームワークを利用せず、JQueryだけで記述するのは、なかなかきついものがあります。
Angular2 では、例えば以下のようにHTMLテンプレートを記述できます。
// 商品入力画面.html
<h2>商品仕入・登録</h2>

<input-inventory [suppliers]="suppliers" (newInventoryAdded)="addNewInventory($event)">
</input-inventory>

<h2>商品一覧</h2>
<p> ... </p>

<inventories [inventories]="inventories">
</inventories>
–
// inventories-component.template.html (InventoriesコンポーネントのTemplate)
<table class="table">
  <thead>
     ...
  </thead>

  <tbody>
    <inventory *ngFor="let inventory of inventories"
                      [inventory]="inventory"
                      (removeInventory)="removeInventory($event)">
    </inventory>
  </tbody>
</table>
上記のように構造化した後、個々のコンポーネント(input-inventory や inventories等) を作りこんでいきます。
このように個々の部品をコンポーネントとして分割していくことで、
より柔軟でメンテナンスしやすいアプリケーションを開発することができます。
Hello Component
では、Angular2のコンポーネントを作ってみましょう。
まずは、Hello と 画面に表示するだけの単純なコンポーネントを作ってみます。
以下コマンドで、Angular2のプロジェクトを作成します。
ng new hello-component
cd hello-component
ng serve # 起動後 http://localhost:4420 にアクセス
まずはこの状態で、ng serveし、トップページにアクセスしてみましょう。以下のような画面が表示されるでしょうか。

hello-component/src/index.html は以下のようになっています。
<!doctype html>
<html>
<head>
  <meta charset="utf-8">
  <title>HelloComponent</title>
  <base href="/">

  {{#unless environment.production}}
  <script src="/ember-cli-live-reload.js" type="text/javascript"></script>
  {{/unless}}
  <meta name="viewport" content="width=device-width, initial-scale=1">
  <link rel="icon" type="image/x-icon" href="favicon.ico">
</head>
<body>
  <app-root>Loading...</app-root>

    {{#each scripts.polyfills}}
    <script src="{{.}}"></script>
    {{/each}}
    <script>
      System.import('system-config.js').then(function () {
        System.import('main');
      }).catch(console.error.bind(console));
    </script>

</body>
</html>
System.import等、細かいところは今は無視しましょう。
重要なのは、<app-root></app-root> という記述です。これがAppComponentです。
そして、AppComponentは、src/app/app.component.ts にて以下のように定義されています。
import { Component } from '@angular/core';

@Component({
  moduleId: module.id,
  selector: 'app-root',
  templateUrl: 'app.component.html',
  styleUrls: ['app.component.css']
})
export class AppComponent {
  title = 'app works!';
}
moduleIdは後で説明します。
selector には tagとして利用したい変数名を記述します。
例えば、selector: 'something' とすると、<something></something> といった具合にコンポーネントが利用できます。
templateUrl、styleUrls には、HTMLテンプレートとcssを指定できます。今は、app.component.html は以下のように定義されています。
<h1>
  {{title}}
</h1>
{{title}} は、AppComponentクラスにて定義した title 変数の値が埋め込まれます。
試しに、AppComponentを以下のように書き換えてみましょう。
// app.component.ts
import { Component } from '@angular/core';

@Component({
  moduleId: module.id,
  selector: 'app-root',
  template: `
    <h1> {{title}} </h1>
  `
})
export class AppComponent {
  title = 'Hello Component!';
}
template を利用することで、Componentクラスに直接テンプレートを記述できます。
この状態で再度アクセスすると、以下のように表示されます。

moduleId は、templateUrl や styleUrls のPathを相対的にかけるようにする、おまじないのようなものです。
もしmoduleIdを定義しないとなると、templateUrlは以下のようなrootからのpathを記述しないといけません。
@Component({
  selector: 'app-root',
  templateUrl: 'app/app.component.html'
})
export class AppComponent {
  title = 'app works!';
}
Angular2が内部的にModuleIdを利用して、相対パスをいい感じのパスに書き換えてくれます。
Built-in Component
Angular2が用意してくれているコンポーネントも幾つか存在しています。
例えば、以下のようなものが存在しています。
- NgIf
- NgSwitch
- ngFor
- ngStyle (styleの定義が動的に変更可能となる)
- ngClass (classの定義が動的に変更可能となる)
以下のように利用できます。
// app.component.ts

import { Component } from '@angular/core';

@Component({
  moduleId: module.id,
  selector: 'app-root',
  template: `
    <h1> {{title}} </h1>

    <p *ngIf="showMessage">
    show Message
    </p>

    <h2> TestTable </h2>

    <table>
      <thead>
      <tr>
        <th>ID</th>
        <th>Name</th>
      </tr>
      </thead>

      <tbody>
      <tr *ngFor="let row of tableRows">
        <td>{{ row.id }}</td>
        <td>{{ row.message }}</td>
      </tr>
      </tbody>
    </table>
  `
})
export class AppComponent {
  public title: string;
  public showMessage: boolean;
  public tableRows: any[];

  ngOnInit() {
    // 初期化が必要な処理は、ここに書くと良いです
    this.title = "Hello Built-in Component";
    this.showMessage = true;
    this.tableRows = [
      { id: 1, message: "Hello"},
      { id: 2, message: "Angular2"},
    ];
  }
}
下記のようなページが表示されたでしょうか。

Angular2が用意しているBuilt-in Directiveを使う場合、必ず (*) を付ける必要があります。
これは、* が template=”ほにゃらら” のsyntaxシュガーだからとかいう理由等あるんですが、今回は入門編なので難しいことは省略します。
詳しくは、https://angular.io/docs/ts/latest/guide/template-syntax.html#!#star-template をご参照ください。
また、その他のBuilt-in Componentの使い方については、https://angular.io/docs/ts/latest/guide/template-syntax.html#!#directives をご参照ください。
今回のまとめ
今回はAngular2の新規プロジェクトの作り方と、Componentの基本的な使い方の説明をしました。
今回利用したサンプルコードは、https://github.com/nishio-dens/angular2-example/tree/master/hello-component においてあります。
次回は、複数のコンポーネントを作り、相互に連携するようなアプリを作っていきます。


